Friday 30 August 2013

AUGUST 30

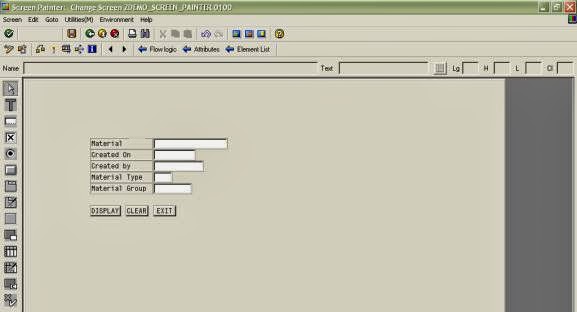
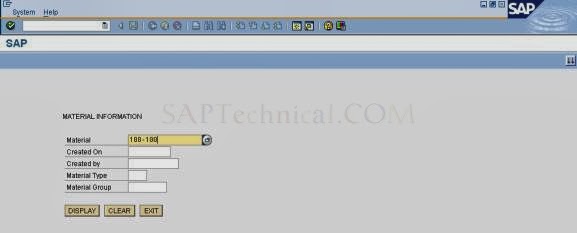
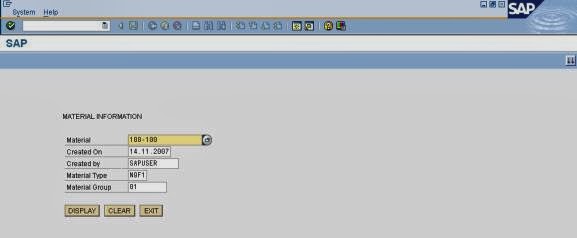
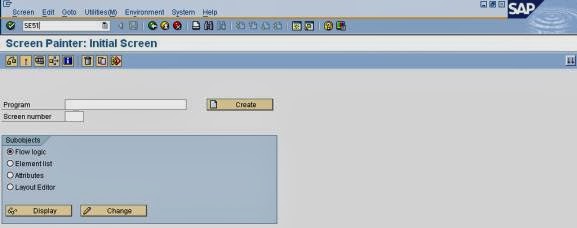
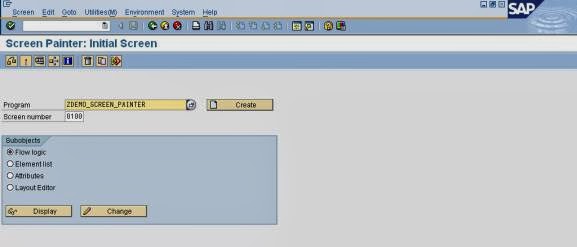
Example programs using screen painter.
Example-1:

&---------------------------------------------------------------------*
*& Report  Z92PROGRAM2
*&
*&---------------------------------------------------------------------*
*&
*&
*&---------------------------------------------------------------------*

Report  Z92PROGRAM2

TABLES : zstudents, zpractice.
******************************************************************
* DATA DECLARATIONS.
*****************************************************************
DATA :  rollnum TYPE zstudents-rollnum,
       name 
TYPE zstudents-name,
       phone 
TYPE zstudents-phone,
       address 
TYPE zstudents-address,
       total 
type zpractice-total,
       branch 
TYPE zpractice-branch,
       
SUBMIT TYPE C,
       
RESET TYPE C,
       
EXIT TYPE C,
       OK_CODE 
LIKE SY-UCOMM.

*&---------------------------------------------------------------------*
*& CALLING SCREEN
*&---------------------------------------------------------------------*

CALL SCREEN 0101.

*&---------------------------------------------------------------------*
*&      Module  STATUS_0101  OUTPUT
*&---------------------------------------------------------------------*
*       text
*----------------------------------------------------------------------*
MODULE STATUS_0101 OUTPUT.
*  SET PF-STATUS 'xxxxxxxx'.
*  SET TITLEBAR 'xxx'.
CASE SY-UCOMM.
    
WHEN 'EXIT'.
      
LEAVE PROGRAM.
    
WHEN 'SUBMIT'.
      
SELECT SINGLE rollnum name phone address FROM zstudents
           
INTO (zstudents-rollnum , zstudents-name , zstudents-phone, zstudents-address)
where rollnum = zstudents-rollnum.
        
SELECT SINGLE branch total from zpractice
          
INTO (zpractice-branch , zpractice-total)
          
WHERE rollnum = zstudents-rollnum.

WHEN 'RESET'.
      
CLEAR zstudents.
      
CLEAR zpractice.

  
ENDCASE.
ENDMODULE.                 
" STATUS_0101  OUTPUT


Example-2:


*&---------------------------------------------------------------------*
*& Report  Z92PROGRAM3
*&
*&---------------------------------------------------------------------*
*&
*&
*&---------------------------------------------------------------------*

REPORT  Z92PROGRAM3 NO STANDARD PAGE HEADING .
TABLES: ZSTUDENTS, ZPRACTICE.
DATA :
   ROLLNUM 
TYPE ZSTUDENTS-ROLLNUM,
 BRANCH 
TYPE ZPRACTICE-BRANCH,
   TOTAL 
TYPE ZPRACTICE-TOTAL,
MARKS_1 
TYPE ZPRACTICE-MARKS_1,
MARKS_2 
TYPE ZPRACTICE-MARKS_2,
MARKS_3 
TYPE ZPRACTICE-MARKS_3,
MARKS_4 
TYPE ZPRACTICE-MARKS_4,
     NAME 
TYPE ZSTUDENTS-NAME,
   PHONE 
TYPE ZSTUDENTS-PHONE,
   ADDRESS 
TYPE ZSTUDENTS-ADDRESS.

DATA:
  
screen  TYPE n LENGTH 4 VALUE 0110,
  ok_code 
LIKE sy-ucomm.
CALL SCREEN 100.
CALL SCREEN 110.
CALL SCREEN 120.
*&---------------------------------------------------------------------*
*&      Module  STATUS_0100  OUTPUT
*&---------------------------------------------------------------------*
*       text
*----------------------------------------------------------------------*
MODULE status_0100 OUTPUT.
  
SET PF-STATUS 'ZMENU'.
ENDMODULE.                 " STATUS_0100  OUTPUT
*&----------------------------------------*
*&MODULE USER_COMMAND_100_INPUT
*&-----------------------------------------*
* TEXT
*&------------------------------------------*
MODULE USER_COMMAND_0100 INPUT.
  
CASE SY-UCOMM.
    
WHEN 'DISPLAY'.
      
SCREEN =  0110.
      
WHEN 'EXIT' OR 'BACK' OR 'CANCEL'.
        
LEAVE PROGRAM.
            
WHEN 'NEXT'.
            
SCREEN = 0120.
        
ENDCASE.
        
ENDMODULE.    "USER_COMMAND_0110 INPUT
*&--------------------------------------------------------------------*
*&      Module  STATUS_0110  OUTPUT
*&---------------------------------------------------------------------*
*       text
*----------------------------------------------------------------------*
MODULE status_0110 OUTPUT.
 
SELECT SINGLE MARKS_1  MARKS_2  MARKS_3  MARKS_4
   BRANCH TOTAL
  
FROM ZPRACTICE
  
INTO (ZPRACTICE-MARKS_1 , ZPRACTICE-MARKS_2 , ZPRACTICE-MARKS_3 ,
   ZPRACTICE-MARKS_4 , ZPRACTICE-BRANCH , ZPRACTICE-TOTAL)
  
WHERE ROLLNUM = ZSTUDENTS-ROLLNUM.
    
CASE SY-UCOMM.
       
WHEN 'RESET'.
      
CLEAR ZSTUDENTS.
      
CLEAR ZPRACTICE.
      
ENDCASE.
ENDMODULE.                 " STATUS_0110  OUTPUT
*----------------------------------------------------------------------*
*---------------------------------------------------------------------*
*&      Module  STATUS_0120  OUTPUT
*&---------------------------------------------------------------------*
*       text
*----------------------------------------------------------------------*
MODULE status_0120 OUTPUT.
  
SELECT SINGLE PHONE NAME ADDRESS
  
FROM ZSTUDENTS
  
INTO (ZSTUDENTS-PHONE , ZSTUDENTS-NAME , ZSTUDENTS-ADDRESS)
  
WHERE ROLLNUM = ZSTUDENTS-ROLLNUM.
    
CASE SY-UCOMM.
    
WHEN 'RESET'.
      
CLEAR ZSTUDENTS.
      
CLEAR ZPRACTICE.
      
ENDCASE.
ENDMODULE.                 
" STATUS_0110  OUTPUT

Thursday 29 August 2013

AUGUST 29

 Screen painter is a tool in ABAP  workbench used to create the screens using the T-code SE51. In the screen painter, we can define the following interface elements with their associated attributes.

  • 1. Input/Output Fields
  • 2. Field Names
  • 3. Checkboxes
  • 4. Radio Buttons
  • 5. Group Boxes
  • 6. Sub screens.
  • 7. Pushbuttons with No Fixed Position


Steps to create a screen in a ABAP program:

1. Create a Z program in SE38.


     Click on Save. We will write the code later in this. 

2. Go to transaction SE51.


3. Enter the created program name and screen number.


4.  Enter the short description and click on save.

5. Click on flow logic tab.


6. Un-comment the statement “ MODULE STATUS_0100 “ and Double click the “ status_0100.”  A dialog box will appear "PBO Module STATUS_0100 does not exist. Create object?"

7. Click on yes.

A pop-up screen appears. Select the “zdemo_screen_painter”  “main program” and click on continue.
A dialog box appears " Screen Zdemo_screen_painter 0100 has been changed. Do you want to save?"

8. Click on yes.

Screen would be displayed as follows: 


Now come back to the transaction SE51. Select flow logic. Click in layout. 

9. Screen painter window will be displayed like this. Here we will design the required screen fields. 
Click on the middle icon    
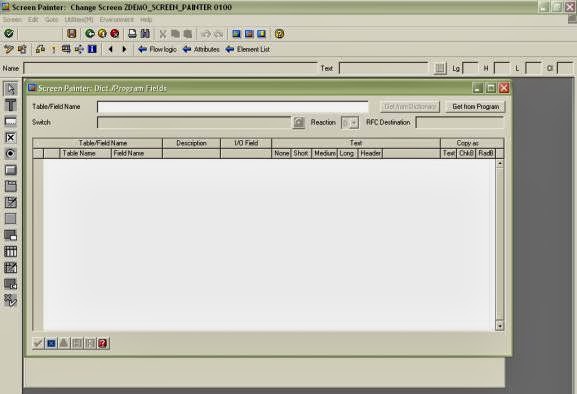
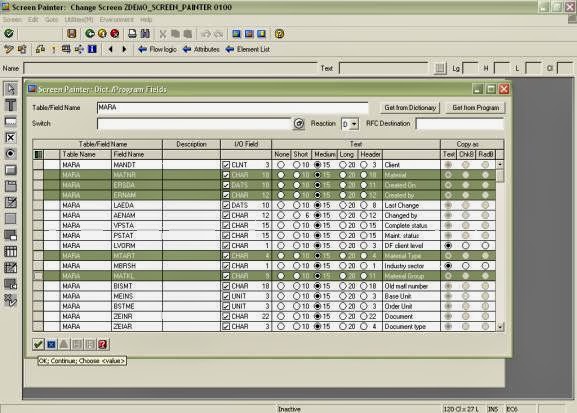
dictionary / program fields window. Or F6. 


following screen appears:


10. Enter the table name in the table field name and Click on get from dictionary. 
Select the required fields from MARA table from dictionary. Click on OK or continue. 


11. Now place them appropriately on the screen created.


After placing the required fields on screen we can see the screen as follows:


12. Create the push button from the toolbox. Select the push button, drag and drop the button onto the screen. 

13. Create the other required buttons in the same procedure mentioned above and assign the name, text, and function code for each one. 

14. After creating the screen click on save check and activate. 


15.  press flow logic button on the screen.


16. Click on tab Element List enter OK_CODE. 

The below Code is written in ZPROGRAM created earlier: 
*&-------------------------------------------------------------------**& Report ZDEMO_SCREEN_PAINTER*&*&-------------------------------------------------------------------**& Demo for Screen Painter.*& By Vikramchellappa.*&-------------------------------------------------------------------*REPORT ZDEMO_SCREEN_PAINTER.******************************************************************* TABLE DECLARATIONS.****************************************************************** TABLES: MARA.******************************************************************* DATA DECLARATIONS.*****************************************************************DATA: MATNR TYPE MARA-MATNR, ERSDA TYPE MARA-ERSDA, ERNAM TYPE MARA-ERNAM, MTART TYPE MARA-MTART, MATKL TYPE MARA-MATKL, DISPLAY TYPE C, SAVE TYPE C, DELETE TYPE C, CLEAR TYPE C, EXIT TYPE C, OK_CODE LIKE SY-UCOMM.****************************************************************** CALLING SCREEN.*****************************************************************CALL SCREEN 100.*&--------------------------------------------------------------**& Module STATUS_0100 OUTPUT*&--------------------------------------------------------------** text*--------------------------------------------------------------*MODULE STATUS_0100 OUTPUT.* SET PF-STATUS 'ZMENU'.* SET TITLEBAR 'ZMENU_PAINTER'.CASE SY-UCOMM. WHEN 'EXIT'. LEAVE PROGRAM. WHEN 'BACK'. LEAVE PROGRAM. WHEN 'DISPLAY'. SELECT SINGLE ERSDA ERNAM MTART MATKL FROM MARA
INTO (MARA-ERSDA, MARA-ERNAM, MARA-MTART, MARA-MATKL)
WHERE MATNR = MARA-MATNR. WHEN 'CLEAR'. CLEAR MARA. ENDCASE.ENDMODULE. " STATUS_0100 OUTPUT

OUTPUT:
 Enter Material number On Material Field. Click on Display. 


Material Information is displayed as shown below: 


Wednesday 28 August 2013

AUGUST 28

Working with Screen Painter in SAP/ABAP

Screen Painter allows us to define the user input screen, meaning that we can define text boxes, drop-down menus, list boxes, input fields, tabbed areas of the screen and so on. It allows you to define the whole interface which the user will eventually use, and behind the initial elements that are put on the screen, you can also define the individual functions which are called when the user interacts with them.

A screen can contain a wide variety of elements, either for displaying field contents, or for allowing the user to interact with the program (for example, filling out input fields or choosing pushbutton functions). we use the Screen Painter to arrange elements on the screen.

Screen Elements:

       Text fields  :  Display elements, which cannot be changed either by the user or by the ABAP program.
       Input/output fields and templates : Used to display data from the ABAP program or for entering data on the screen. Linked to screen fields.
        Dropdown list boxes :  Special input/output fields that allow users to choose one entry from a fixed list of possible entries.
       Checkbox elements  : Special input/output fields that the user can either select (value ‘X’) or deselect (value SPACE). Checkbox elements can be linked with function codes.
    Radio button elements : Special input/output fields that are combined into groups. Within a radio button group, only a single button can be selected at any one time. When the user selects one button, all of the others are automatically deselected. Radio button elements can be linked with function codes.
        Pushbuttons : Elements on the screen that trigger the PAI event of the screen flow logic when chosen by the user. There is a function code attached to each pushbutton, which is passed to the ABAP program when it is chosen.
        Subscreens : Area on the screen in which you can place another screen.
        Table controls : Tabular input/output fields.
        Box : Display element, used for visual grouping of related elements on the screen, such as
radio button groups.
        Tabstrip controls : Areas on the screen in which you can switch between various pages.
        OK field : Every screen has a twenty-character OK_CODE field (also known as the function code field) that is not displayed directly on the screen.

Screen Attributes

Like all objects in the R/3 Repository, screens have attributes that both describe them and
determine how they behave at run time. Important screen attributes for ABAP programming:
 Program: The name of the ABAP program (type 1, M, or F) to which the screen belongs.
 Screen number : A four-digit number, unique within the ABAP program, that identifies the screen within the program.
 Screen type : A normal screen occupies a whole GUI window. Modal dialog boxes only cover a part of
a GUI window. Their interface elements are also arranged differently. Selection screens
are generated automatically from the definition in the ABAP program. We may not define
them using the Screen Painter. A sub screen is a screen that we can display in a
sub screen area on a different screen in the same ABAP program.
 Next screen : Statically-defined screen number, specifying the next screen in the sequence. If we
enter zero or leave the field blank, we define the current screen as the last in the chain.
If the next screen is the same as the current screen, the screen will keep on calling itself.
we can override the statically-defined next screen in the ABAP program.

Processing Screens:

There are two ways of calling a screen. we can either use a transaction code, or the CALL SCREEN statement in an ABAP program. When we call a screen, the PROCESS BEFORE OUTPUT event (PBO) is called, and the corresponding event block in the screen flow logic is processed. The screen itself is then displayed until the user triggers the PROCESS AFTER INPUT (PAI) event by choosing a function. In between, there may be field or input help processing. The corresponding event blocks in the flow logic are processed, if they exist. The main purpose of event blocks in the screen flow logic is to call dialog modules in the ABAP program and to provide the ABAP program with data.

Example of  screen in screen painter:


Tuesday 27 August 2013

AUGUST 27

 SAP ALV:

ALV stands for ABAP List Viewer. ALV gives us a standard List format and user interface to all our ABAP reports. ALV is created by a set of standard function modules provided by SAP.
ALV provides a lot of inbuilt functions to our reports and some of the functions  are listed below.
  • Sorting of records
  • Filtering of records
  • Totals and Sub-totals
  • Download the report output to Excel/HTML
  • Changing the order of the columns in the report
  • Hide the unwanted columns  from the report
Some of the function modules used to create ALV reports are listed below.
FUNCTION MODULEDESCRIPTION
REUSE_ALV_LIST_DISPLAYDisplay an ALV list
REUSE_ALV_GRID_DISPLAYDisplay an ALV grid
REUSE_ALV_COMMENTARY_WRITEOutput List header information
REUSE_ALV_VARIANT_F4Display variant selection dialog box
REUSE_ALV_VARIANT_EXISTENCEChecks whether a variant exists
REUSE_ALV_FIELDCATALOG_MERGECreate field catalog from dictionary structure or internal table
Simple ALV report.
Example:

DATA: it_spfli TYPE TABLE OF spfli.

SELECT * FROM spfli INTO TABLE it_spfli.

CALL FUNCTION 'REUSE_ALV_GRID_DISPLAY'
  EXPORTING
    i_structure_name = 'SPFLI'
  TABLES
    t_outtab         = it_spfli.

An ALV report is created using the standard function modules provided by SAP.
An ALV report can be created using the following steps.

  • Include SLIS type pool – SLIS type pool contains all the data types required by ALV function modules.
  • Data retrieval – Code the logic to fetch the data from database table into an Internal Table.
  • Build Field Catalog – Add the columns into an internal that you want to display in the ALV output list.
  • Pass the data table and field catalog table to ALV function module
TYPE-POOLS: slis.  " SLIS contains all the ALV data types

*&---------------------------------------------------------------------*
*& Data Declaration
*&---------------------------------------------------------------------*
DATA: it_sbook     TYPE TABLE OF sbook.
DATA: it_fieldcat  TYPE slis_t_fieldcat_alv,
      wa_fieldcat  TYPE slis_fieldcat_alv.
*&---------------------------------------------------------------------*
*& START-OF-SELECTION
*&---------------------------------------------------------------------*
START-OF-SELECTION.

*Fetch data from the database

  SELECT * FROM sbook INTO TABLE it_sbook.

*Build field catalog

  wa_fieldcat-fieldname  = 'CARRID'.    " Field name in the data table
  wa_fieldcat-seltext_m  = 'Airline'.         " Column description in the output
  APPEND wa_fieldcat TO it_fieldcat.

  wa_fieldcat-fieldname  = 'CONNID'.
  wa_fieldcat-seltext_m  = 'Con. No.'.
  APPEND wa_fieldcat TO it_fieldcat.

  wa_fieldcat-fieldname  = 'FLDATE'.
  wa_fieldcat-seltext_m  = 'Date'.
  APPEND wa_fieldcat TO it_fieldcat.

  wa_fieldcat-fieldname  = 'BOOKID'.
  wa_fieldcat-seltext_m  = 'Book. ID'.
  APPEND wa_fieldcat TO it_fieldcat.

  wa_fieldcat-fieldname  = 'PASSNAME'.
  wa_fieldcat-seltext_m  = 'Passenger Name'.
  APPEND wa_fieldcat TO it_fieldcat.

*Pass data and field catalog to ALV function module to display ALV list

  CALL FUNCTION 'REUSE_ALV_GRID_DISPLAY'
    EXPORTING
      it_fieldcat   = it_fieldcat
    TABLES
      t_outtab      = it_sbook
Output:


Monday 26 August 2013

AUGUST 26

Few more concepts used with ABAP internal Tables:

DESCRIBE TABLE is the statement to get the attributes like number of lines, line width of each row etc. of the internal table. 
Syntax:

DESCRIBE TABLE <internal table> [LINES <lines>].

SORT is the statement to sort an ABAP internal table. We can specify the direction of the sort using the additions ASCENDING and DESCENDING. The default is ascending.
Syntax:

SORT <internal table> [ASCENDING|DESCENDING]

We can also delete the adjacent duplicates from an internal table by using the following statement.
Syntax:

DELETE ADJACENT DUPLICATE ENTRIES FROM <internal table>
                 [COMPARING <f1> <f2> ... |ALL FIELDS].

COMPARING ALL FIELDS is the default. If we do not specify the COMPARING addition, then the system compares all the fields of both the lines. If we specify fields in the COMPARING clause, then the system compares only the fields specified after COMPARING of both the lines. 

Example:
*--------------------------------------------------------------*
*Data Types
*--------------------------------------------------------------*
TYPES: BEGIN OF ty_student,
       id(5)     TYPE n,
       name(10)  TYPE c,
       place(10) TYPE c,
       age       TYPE i,
       END OF ty_student.

*--------------------------------------------------------------*
*Data Declaration
*--------------------------------------------------------------*
DATA: gwa_student TYPE ty_student.
DATA: it  TYPE TABLE OF ty_student.
DATA: gv_lines TYPE i.

gwa_student-id     = 1.
gwa_student-name   = 'JOHN'.
gwa_student-place  = 'London'.
gwa_student-age    = 20.
APPEND gwa_student TO it.

gwa_student-id     = 2.
gwa_student-name   = 'JIM'.
gwa_student-place  = 'New York'.
gwa_student-age    = 21.
APPEND gwa_student TO it.

gwa_student-id     = 3.
gwa_student-name   = 'JACK'.
gwa_student-place  = 'Bangalore'.
gwa_student-age    = 20.
APPEND gwa_student TO it.

gwa_student-id     = 4.
gwa_student-name   = 'ROB'.
gwa_student-place  = 'Bangalore'.
gwa_student-age    = 22.
APPEND gwa_student TO it.

gwa_student-id     = 2.
gwa_student-name   = 'JIM'.
gwa_student-place  = 'New York'.
gwa_student-age    = 21.
APPEND gwa_student TO it.

DESCRIBE TABLE it LINES gv_lines.
WRITE:/ 'No. of lines in IT : ', gv_lines.

WRITE:/ 'SY-TFILL : ', sy-tfill.
WRITE:/ 'SY-TLENG : ', sy-tleng.

WRITE:/ 'Values in IT before SORT' COLOR 4.

WRITE:/ 'ID' COLOR 5,7 'Name' COLOR 5, 18 'Place' COLOR 5,
        37 'Age' COLOR 5.
LOOP AT it INTO gwa_student.
  WRITE:/ gwa_student-id, gwa_student-name, gwa_student-place,
          gwa_student-age.
ENDLOOP.

WRITE:/ 'Values in IT after SORT' COLOR 4.

*SORT by name

SORT it BY name DESCENDING.

WRITE:/ 'ID' COLOR 5,7 'Name' COLOR 5, 18 'Place' COLOR 5,
        37 'Age' COLOR 5.
LOOP AT it INTO gwa_student.
  WRITE:/ gwa_student-id, gwa_student-name, gwa_student-place,
          gwa_student-age.
ENDLOOP.

WRITE:/ 'Values in IT after deleting duplicates' COLOR 4.

*Delete duplicates

SORT it.
DELETE ADJACENT DUPLICATES FROM it.

WRITE:/ 'ID' COLOR 5,7 'Name' COLOR 5, 18 'Place' COLOR 5,
        37 'Age' COLOR 5.
LOOP AT it INTO gwa_student.
  WRITE:/ gwa_student-id, gwa_student-name, gwa_student-place,
          gwa_student-age.
ENDLOOP.

WRITE:/ 'Values in IT after deleting duplicates comparing place' COLOR 4.

*Delete duplicates comparing only place

SORT it BY place.
DELETE ADJACENT DUPLICATES FROM it COMPARING place.

WRITE:/ 'ID' COLOR 5,7 'Name' COLOR 5, 18 'Place' COLOR 5,
        37 'Age' COLOR 5.
LOOP AT it INTO gwa_student.
  WRITE:/ gwa_student-id, gwa_student-name, gwa_student-place,
          gwa_student-age.
ENDLOOP.

We can exit out of LOOP/ENDLOOP processing using EXIT, CONTINUE and CHECK similar to all other LOOPS.
We can  also initialize the internal table using FREE, CLEAR and REFRESH statements. CLEAR and REFRESH just initializes the internal table where as FREE initializes the internal table and releases the memory space.
Example:

*--------------------------------------------------------------*
*Data Types
*--------------------------------------------------------------*
TYPES: BEGIN OF ty_student,
       id(5)     TYPE n,
       name(10)  TYPE c,
       place(10) TYPE c,
       age       TYPE i,
       END OF ty_student.

*--------------------------------------------------------------*
*Data Declaration
*--------------------------------------------------------------*
DATA: gwa_student TYPE ty_student.
DATA: it  TYPE TABLE OF ty_student.
DATA: gv_lines TYPE i.

gwa_student-id     = 1.
gwa_student-name   = 'JOHN'.
gwa_student-place  = 'London'.
gwa_student-age    = 20.
APPEND gwa_student TO it.

gwa_student-id     = 2.
gwa_student-name   = 'JIM'.
gwa_student-place  = 'New York'.
gwa_student-age    = 21.
APPEND gwa_student TO it.

WRITE:/ 'Values in IT before initializing' COLOR 4.

WRITE:/ 'ID' COLOR 5,7 'Name' COLOR 5, 18 'Place' COLOR 5,
        37 'Age' COLOR 5.
LOOP AT it INTO gwa_student.
  WRITE:/ gwa_student-id, gwa_student-name, gwa_student-place,
          gwa_student-age.
ENDLOOP.

*Initialize IT

CLEAR it.

SKIP.
WRITE:/ 'Values in IT before initializing' COLOR 4.
WRITE:/ 'ID' COLOR 5,7 'Name' COLOR 5, 18 'Place' COLOR 5,
        37 'Age' COLOR 5.
LOOP AT it INTO gwa_student.
  WRITE:/ gwa_student-id, gwa_student-name, gwa_student-place,
          gwa_student-age.
ENDLOOP.

*If no records are processed inside LOOP, then SY-SUBRC <> 0

IF sy-subrc <> 0.
  WRITE:/ 'No records found.'.
ENDIF.

SKIP.
*We can also use IS INITIAL to check any records found in IT

IF it IS INITIAL.
  WRITE:/ 'No records found in IT.'.
ENDIF.